
Getting Started
Overview
Suppose you are not SQL-guru but need to deal with databases - find some information, filter table(s) by parameters, build an SQL query touse it somewhere outside. In this case Easy Query Builder utility is your assistant.
It allows you to build SQL query to the database without need to deal with SQL syntax. It takes just a few clicks to add conditions and build the query. Using our user-friendly interface the query is built in virtually natural language.
Interface
Move your mouse over the screenshot and click on highlighted region.

Powered By
The heart of Easy Query Builder, the basis it is built on is EasyQuery.NET component set made by Korzh.com. Our components allows you to include end-user-oriented query builder into your program or ASP.NET web-site and helps your users to run any queries on a database they can imagine ? without contacting your support team and without having to write a single line of code.
Main features of EasyQuery.NET are:
- Natural language user interface for query building
- Programming language: C#
- Distributed as 100% pure .NET assemblies
- Supported .NET framework versions: 2.0 and higher
- Supported databases: MS Access, MS SQL Server, Oracle, MySQL, PostgreSQL as well as any other database which can be used through ADO.NET
Database basics
What is database connection
Whenever you want to do something with the database, the application should know how to access this database. The information about a data source and the means of connecting to it we call “database connection”. It is stored as named object and can be opened later on, if saved.
See also: How to create a database connection
How to create connection
To create new database connection click the “Create New Database Connection…” link on the starting page or select “Database | New Connection…” menu item. The “Build connection” dialog appears.
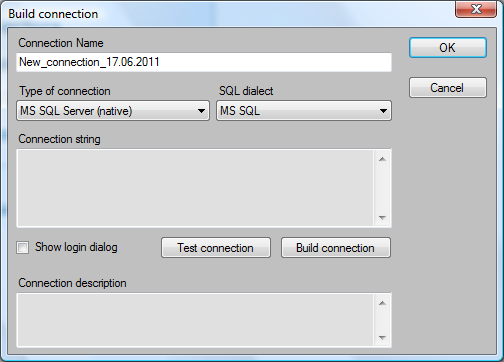
Type some unique name to the “Connection Name” field. This name will be used to store and load the database connection. You can omit this step and give the database connection name later, if needed.
Easy Query Builder supports different types of databases, so they require different types of connection. You need to select the connection type in the “Type of connection” list. The possible values are: MS SQL Server, ODBC, OLE DB, MySQL, Oracle SQL Server, etc.
So called “connection string” contains the meaning part of database connection. The connection string may include attributes such as the name of the driver, server and database, as well as security information such as user name and password.
Depending on selected connection type it may be possible to build the connection string using a special dialog. In this case the “Build connection” button will be enabled.
If you don’t want to specify the login and password in the connection string, mark the “Show login dialog” checkbox. You will be able to enter this parameters in appeared dialog.
Use “Test connection” button to check if you specified the connection string correctly.
What is query
The query is set of rules that describe what data you want to extract from database. Usually it consists of:
- Conditions the data should fulfill to (i.e. “price is greater than 100”, “last name starts with ‘Gor’”, etc.). Conditions can be grouped using brackets and “and”/”or” union.
- Columns you want to see in the result. Usually correspond to the fields of database tables but also can aggregate values from some data subset (i.e. “Count of sales (by months)”, “Average temperature”, etc.)
- Sorting rules - the order data should be sorted in.
How to build query
Adding conditions
Adding columns
In “Query Columns” panel click “Click here to add new column” link. Select the desired table/column from the appeared menu. The new row will be created.

The first link is the name of selected table/column.
The second link is a caption of the column as it will be shown in the result table.
The last link is the column sorting order. It can be “Not sorted”, “Ascending” or “Descending”.
Click the proper link to change the value it embodies.
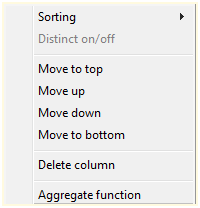
Press the grey button to get the popup menu appeared:
Aggregated columns
Select “Aggregate function” item in the button popup menu to make the column aggregated. The first link allows you to select the aggregate function (i.e. sum, average, count etc.)

Several columns may be set as aggregated. All other (not aggregated) columns will be used to group the aggregated columns data.
Sorting
There are two ways to sort result data by some attribute.

First, you may click “Click here to add new column” link in the “Columns Sorting” panel. The added column will not be present in the result but the result data will be ordered with a glance of its data. You also will be able to change the selected attribute any time (see first row on the screenshot).
Second, you may change the “Not sorted” state of one of the columns in “Query Columns” panel. The new row will appear in the “Columns Sorting” panel (see second row on the screenshot).
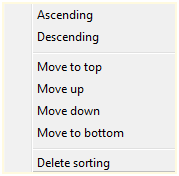
Press the grey button to get the popup menu appeared:
Multiple attribute operations
Getting query results
SQL
Every time you change something in your query the SQL text is updated to meet the changes. You may use the built query outside the Easy Query Builder - just copy the SQL text and paste it wherever you need.
Table
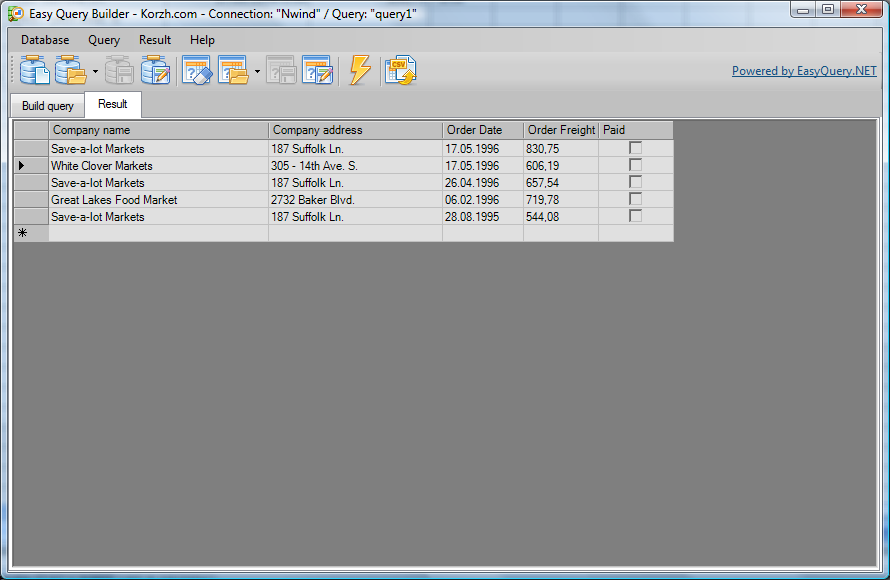
To see the result of the query you built press “Execute SQL” button. You can also use “Query | Execute SQL” menu item correspondingly.
The extracted data can be found on “Result” page.
Export to Excel
When the result table is filled you may export it to CSV file that can be read by Microsoft Excel. Use “Export the result to CSV” button or “Result | Export to…” menu item.